Hello guys,
This is my first blog ever, dedicated to all of my students facing difficulties while interfacing Arduino with L293D.
Will keep it short and simple to define the wiring, with no further fancy theories to confuse you all.
Step by step procedure is mentioned.
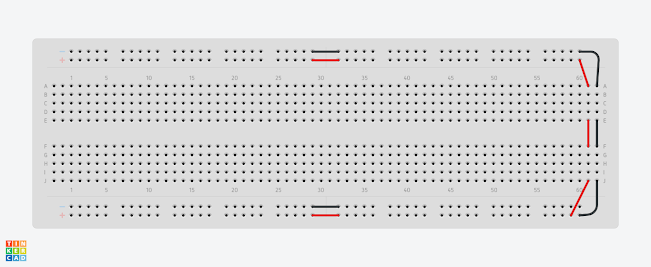
1) Please do the proper wiring of BreadBoard, from the mid it is not connected so this image will show you how exact the wiring should be.
this is much needed so that your Vcc (5V) and GND (-ive) must be connected without any issues.
2) Make sure the wiring is done as per the proper connection. Consider for this time that our L293D has 2 sections mean right section and left section, and the 2 center pins are GND always!
the below picture is of the wiring, if you'll wire properly everything will be smooth.
3) The code: Code is as simple as LED blink code, you have 4 pins, each pin should be declared as OUTPUT in setup and while in loop keep the alternate 2 pins high and the other 2 low
for example, from the left, make only 1 high and other low and also from right part keep 1 high and another low. you'll get a better idea with the code pasted below.
int ma1 = 11; //motor a pin1
int ma2 = 10; //motor a pin2
int mb1 = 9; //motor b pin1
int mb2 = 8; //motor b pin2
void setup() {
pinMode (ma1,OUTPUT);
pinMode (ma2,OUTPUT);
pinMode (mb1,OUTPUT);
pinMode (mb2,OUTPUT);
}
void loop() {
digitalWrite(ma1,LOW);
digitalWrite(ma2,LOW);
digitalWrite(mb1,LOW);
digitalWrite(mb2,LOW);
delay(100);
// forward motion of motor
digitalWrite(ma1,HIGH);
digitalWrite(ma2,LOW);
digitalWrite(mb1,HIGH);
digitalWrite(mb2,LOW);
delay(3000);
//Reverse motion of motor
digitalWrite(ma1,LOW);
digitalWrite(ma2,HIGH);
digitalWrite(mb1,LOW);
digitalWrite(mb2,HIGH);
delay(3000);
}
Now, if case you need other help, you can reach me also I'm sharing the Tinkercad link below for better/
https://www.tinkercad.com/things/1lhJh9GFzTl?sharecode=7-eEqWt86SOktdKdjr03ZBYjtBZlfHhkPGLPUy9S0KA
Enjoy and take care
Yours,
Mr. Tomato
Show your love by sharing with others.


Comments
Post a Comment